What is Ansible?
Ansible is the easiest way to deploy, manage, and orchestrate computer systems you've ever seen. You can get started in minutes.
Ansible is an extra-simple tool/framework/API for doing 'remote things' over SSH.
Ansible is an IT automation tool. It can configure systems, deploy software, and orchestrate more advanced IT tasks such as continuous deployments or zero downtime rolling updates.
Background
Ansible was created and is run by Michael DeHaan, a Raleigh, NC based software developer and architect, who also created the popular open-source DevOps install server Cobbler. Cobbler is used to deploy mission critical systems all over the planet, in industries ranging from core internet infrastructure, finance, chip design, massively multiplayer gaming, and more.
Michael also co-authored Func, a precursor to Ansible, which is used to orchestrate systems in lots of diverse places. He’s worked on systems software for IBM, Motorola, Red Hat’s Emerging Technologies Group, Puppet Labs, and is now with rPath. Reach Michael by email here
Ansible is open source software (GPLv3), and is developed by a large group of industry-experts from all over the world.
Highlights
- Orchestrate From Above
Most software does not run on a single machine. Ansible parallelizes complex multi-tier rollouts across app servers, databases, monitoring servers, and load balancers. - Have your first playbook running in minutes
Ansible avoids cumbersome management daemons and the need for seperate configuration, deployment, and task execution tools. - Clear and Concise
"Automation Even A Manager Can Understand" -- An actual manager. - Automation in Plain English
Ansible is optimized for easy automation, review, editing, & auditability.
Features
- Management over SSH
You don't need to install any daemons. You don't need to wrestle with a custom PKI solution. Add a Ruby stack? No need. Ansible manages machines over SSH, something you've already got out there, and you know to be secure. Need to use Kerberos or SSH Jump Hosts? No problem! Want to go faster? Ansible 0.8 can bootstrap an ephemeral 0mq connection! - Developer Friendly
Configurations are text. Ansible modules can be written in any language -- if you would like to add extensions in bash, Python, Ruby, or even C, you are welcome to do so. Inventory can be pulled in from external sources like EC2, OpenStack, and Cobbler! Dead simple
In addition to not requiring any daemons or bootstrapping, Ansible's Playbook language is the simplest systems management language out there. It reads like English. We believe you have other work to do, so we want you to get things done quickly and get out of your way.
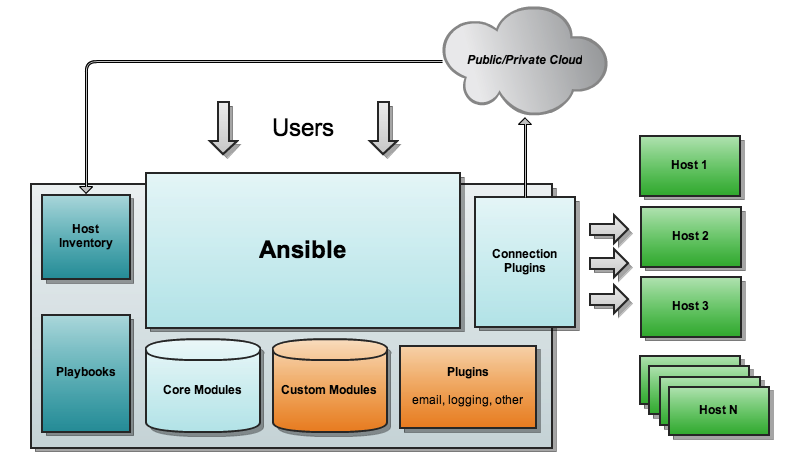
Architecture Overview
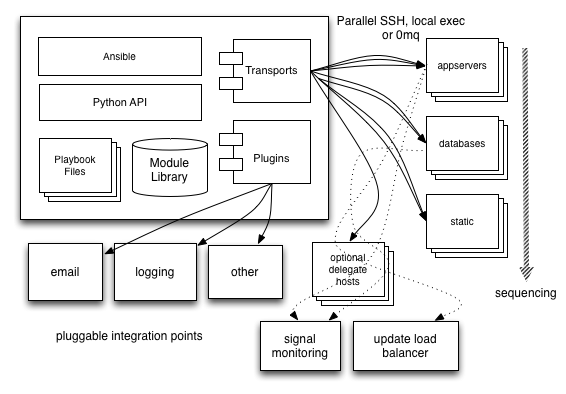
Ansible runs on a central computer. Playbooks define configuration policy and orchestration workflows. Ansible then uses SSH to execute modules on remote machines without having to install any systems management software. Ansible comes with a large selection of modules for automating common tasks, and users can also write their own in their choice of favorite language. Inventory can be sourced from simple text files, the cloud, or configuration management databases (CMDBs). Results can be stored and processed into a variety of systems.
Getting Started
Requirements
Requirements for Ansible are extremely minimal.
Ansible is written for Python 2.6. If you are running Python 2.5 on an “Enterprise Linux” variant, your distribution can easily install 2.6 (see instructions in the next section). Newer versions of Linux and OS X should already have 2.6. In additon to Python 2.6, you will want the following packages:
- paramiko
- PyYAML
- python-jinja2
- httplib2
On the managed nodes, you only need Python 2.4 or later, but if you are are running less than Python 2.6 on them, you will also need
- python-simplejson
Note: Ansible’s “raw” module (for executing commands in a quick and dirty way) and the copy module – some of the most basic features in ansible – don’t even need that. So technically, you can use Ansible to install python-simplejson using the raw module, which then allows you to use everything else. (That’s jumping ahead though.)
Install Ansible from Source
To get all the latest features, keep up to date with the development branch of the git checkout. This also makes it easiest to contribute back to the project.
Ansible’s release cycles are usually about two months long. Due to this short release cycle, minor bugs will generally be fixed in the next release versus maintaining backports on the stable branch. Major bugs will still have maintenance releases when needed, though these are infrequent.
Running From Checkout
Ansible is trivially easy to run from a checkout, root permissions are not required to use it
$ git clone https://github.com/ansible/ansible.git
$ cd ./ansible
$ source ./hacking/env-setup
You can optionally specify an inventory file (see Inventory & Patterns) other than /etc/ansible/hosts:
$ echo "127.0.0.1" > ~/ansible_hosts
$ export ANSIBLE_HOSTS=~/ansible_hosts
Test
$ ansible all -m ping -k
Choosing Between Paramiko and Native SSH
It's important to understand how Ansible is communicating with remote machines over SSH.
By default, Ansible 1.3 and later will try to use native OpenSSH for remote communication when possible. This enables both ControlPersist (a performance feature), Kerberos, and options in ~/.ssh/config such as Jump Host setup.
When using Enterprise Linux 6 operating systems as the control machine (Red Hat Enterprise Linux and derivatives such as CentOS), however, the version of OpenSSH may be too old to support ControlPersist. On these operating systems, Ansible will fallback into using a high-quality Python implementation of OpenSSH called ‘paramiko’. If you wish to use features like Kerberized SSH and more, consider using Fedora, OS X, or Ubuntu as your control machine until a newer version of OpenSSH is available for your platform - or engage ‘accelerated mode’ in Ansible. See Accelerated Mode.
In Ansible 1.2 and before, the default was strictly paramiko and native SSH had to be explicitly selected with -c ssh or set in the configuration file.
Occasionally you’ll encounter a device that doesn’t do SFTP. This is rare, but if talking with some remote devices that don’t support SFTP, you can switch to SCP mode in The Ansible Configuration File.
When speaking with remote machines, Ansible will by default assume you are using SSH keys - which is encouraged - but passwords are fine too. To enable password auth, supply the option --ask-pass where needed. If using sudo features and when sudo requires a password, also supply --ask-sudo-pass as appropriate.
While it may be common sense, it is worth sharing: Any management system benefits from being run near the machines being managed. If running in a cloud, consider running Ansible from a machine inside that cloud. It will work better than on the open internet in most cases.
As an advanced topic, Ansible doesn’t just have to connect remotely over SSH. The transports are pluggable, and there are options for managing things locally, as well as managing chroot, lxc, and jail containers. A mode called ‘ansible-pull’ can also invert the system and have systems ‘phone home’ via scheduled git checkouts to pull configuration directives from a central repository.
By default, ansible uses paramiko to talk to managed nodes over SSH. Paramiko is fast, works very transparently, requires no configuration, and is a good choice for most users. However, it does not support some advanced SSH features that folks will want to use.
New in version 0.5.
If you want to leverage more advanced SSH features (such as Kerberized SSH or jump hosts), pass the flag "--connection=ssh" to any ansible command, or set the ANSIBLE_TRANSPORT environment variable to ‘ssh’. This will cause Ansible to use openssh tools instead.
If ANSIBLE_SSH_ARGS are not set, ansible will try to use some sensible ControlMaster options by default. You are free to override this environment variable, but should still pass ControlMaster options to ensure performance of this transport. With ControlMaster in use, both transports are roughly the same speed. Without CM, the binary ssh transport is signficantly slower.
If none of this makes sense to you, the default paramiko option is probably fine.
Test Ansible
Synopsis: ansible <host-pattern> [-f forks] [-m module_name] [-a args] -i INVENTORY
NOTE: inventory host file defaults to /etc/ansible/hosts
Edit (or create) ~/ansible_hosts and put some test virtual machines in it, for which you have your SSH key in authorized_keys
tux.apac.lab
devops.apac.lab
jira.apac.lab
Set up SSH agent to avoid retyping passwords
$ ssh-agent bash
$ ssh-add ~/.ssh/id_rsa
NOTE: Use ansible’s --private-key-file option to specify a pem file.
Override the default ansible hosts file => /etc/ansible/hosts
$ export ANSIBLE_HOSTS=~/ansible_hosts
Now ping all the nodes
$ ansible all -m ping -u root -k -i ansible_hosts
SSH password:
172.16.61.33 | success >> {
    "changed": false,
    "ping": "pong"
}
172.16.61.31 | success >> {
    "changed": false,
    "ping": "pong"
}
172.16.61.37 | success >> {
    "changed": false,
    "ping": "pong"
}
172.16.61.32 | success >> {
    "changed": false,
    "ping": "pong"
}
172.16.61.38 | success >> {
    "changed": false,
    "ping": "pong"
}
In Ansible 0.7 and later, ansible will attempt to remote connect to the machines using your current user name, just like SSH would. In 0.6 and before, this actually defaults to ‘root’ (we liked the current user behavior better). To override the remote user name, just use the ‘-u’ parameter.
Access sudo mode, there are also flags to do that
# as terry
$ ansible all -m ping -u terry
# as terry, sudoing to root
$ ansible all -m ping -u terry --sudo
# as terry, sudoing to batman
$ ansible all -m ping -u terry --sudo --sudo-user batman
Now run live commands on all of your nodes, to see how many processors or cores the machines have
$ ansible all -a "grep -c processor /proc/cpuinfo" -u root -k -i frontline_pool
SSH password:
172.16.61.32 | success | rc=0 >>
4
172.16.61.31 | success | rc=0 >>
4
172.16.61.33 | success | rc=0 >>
4
172.16.61.37 | success | rc=0 >>
4
172.16.61.38 | success | rc=0 >>
4
Check uptime
$ ansible all -a "uptime" -u root -k -i frontline_pool
SSH password:
172.16.61.31 | success | rc=0 >>
 15:25:00 up 194 days, 17:22,  3 users,  load average: 1.55, 1.29, 1.23
172.16.61.33 | success | rc=0 >>
 15:25:00 up 209 days, 16:31,  2 users,  load average: 1.02, 1.02, 1.00
172.16.61.37 | success | rc=0 >>
 15:25:00 up 182 days, 14:24,  2 users,  load average: 1.09, 1.04, 1.01
172.16.61.38 | success | rc=0 >>
 15:25:00 up 216 days,  4:58,  2 users,  load average: 1.99, 1.72, 1.67
172.16.61.32 | success | rc=0 >>
 15:25:00 up 194 days, 17:22,  2 users,  load average: 1.23, 1.07, 1.02
Ansible is NOT just about running commands, it also has powerful configuration management and deployment features. There’s more to explore, but you already have a fully working infrastructure!
New in 1.2, use -i to specify host file
Run apt-get update on Ubuntu hosts using sudo mode
# Public Key Authentication
ansible all -a "apt-get update" -u terry -i lab_hosts --sudo
# Prompt for password
ansible all -a "apt-get update" -u terry -k -i lab_hosts
NOTE: use --sudo-user username to specify sudo user.
Parallelism
Now to run the command on all servers in a group, in 10 parallel forks
$ ansible all -a "uname -a" -k  -u terry -f 10 -i ansible_hosts
SSH password:
10.187.38.118 | success | rc=0 >>
Linux focus.au.oracle.com 3.8.0-25-generic #37-Ubuntu SMP Thu Jun 6 20:47:07 UTC 2013 x86_64 x86_64 x86_64 GNU/Linux
support.au.oracle.com | success | rc=0 >>
Linux support 3.2.0-48-generic-pae #74-Ubuntu SMP Thu Jun 6 20:05:01 UTC 2013 i686 i686 i386 GNU/Linux
tesla.au.oracle.com | success | rc=0 >>
Linux tesla 3.8.0-25-generic #37-Ubuntu SMP Thu Jun 6 20:47:07 UTC 2013 x86_64 x86_64 x86_64 GNU/Linux
In 0.7 and later, this will default to running from your user account. If you do not like this behavior, pass in "-u username". (In 0.6 and before, it defaulted to root. Most folks prefered defaulting to the current user, so we changed it).
NOTE: -f FORKS, --forks=FORKS, specify number of parallel processes to use (default=5).
Files
Ansible files
- /etc/ansible/hosts — Default inventory file
- /usr/share/ansible/ — Default module library
- /etc/ansible/ansible.cfg — Config file, used if present
- ~/.ansible.cfg — User config file, overrides the default config if present
Environment Variables
The following environment variables may specified
- ANSIBLE_HOSTS — Override the default ansible hosts file
- ANSIBLE_LIBRARY — Override the default ansible module library path
- ANSIBLE_CONFIG — Override the default ansible config file
Inventory
Ansible works against multiple systems in your infrastructure at the same time. It does this by selecting portions of systems listed in Ansible’s inventory file, which defaults to being saved in the location /etc/ansible/hosts.
Not only is this inventory configurable, but you can also use multiple inventory files at the same time (explained below) and also pull inventory from dynamic or cloud sources, as described in Dynamic Inventory.
Hosts and Groups
mail.example.com

[webservers]
foo.example.com
bar.example.com

[dbservers]
one.example.com
two.example.com
three.example.com
The things in brackets are group names, which are used in classifying systems and deciding what systems you are controlling at what times and for what purpose.
It is ok to put systems in more than one group, for instance a server could be both a webserver and a dbserver. If you do, note that variables will come from all of the groups they are a member of, and variable precedence is detailed in a later chapter.
If you have hosts that run on non-standard SSH ports you can put the port number after the hostname with a colon. Ports listed in your SSH config file won’t be used, so it is important that you set them if things are not running on the default port:
badwolf.example.com:5309
Suppose you have just static IPs and want to set up some aliases that don’t live in your host file, or you are connecting through tunnels. You can do things like this:
jumper ansible_ssh_port=5555 ansible_ssh_host=192.168.1.50
In the above example, trying to ansible against the host alias “jumper” (which may not even be a real hostname) will contact 192.168.1.50 on port 5555. Note that this is using a feature of the inventory file to define some special variables. Generally speaking this is not the best way to define variables that describe your system policy, but we’ll share suggestions on doing this later. We’re just getting started.
Adding a lot of hosts? If you have a lot of hosts following similar patterns you can do this rather than listing each hostname:
[webservers]
www[01:50].example.com
For numeric patterns, leading zeros can be included or removed, as desired. Ranges are inclusive. You can also define alphabetic ranges:
[databases]
db-[a:f].example.com
You can also select the connection type and user on a per host basis:
[targets]

localhost              ansible_connection=local
other1.example.com     ansible_connection=ssh        ansible_ssh_user=mpdehaan
other2.example.com     ansible_connection=ssh        ansible_ssh_user=mdehaan
As mentioned above, setting these in the inventory file is only a shorthand, and we’ll discuss how to store them in individual files in the ‘host_vars’ directory a bit later on.
See more: http://docs.ansible.com/intro_inventory.html
Configuration and Defaults
New in version 0.7+.
Ansible has an optional configuration file that can be used to tune settings and also eliminate the need to pass various command line flags. Ansible will look for the config file in the following order, using the first config file it finds present
- File specified by the ANSIBLE_CONFIG environment variable
- ansible.cfg in the current working directory. (version 0.8 and up)
- ~/.ansible.cfg
- /etc/ansible/ansible.cfg
For those running from source, a sample configuration file lives in the examples/ directory. The RPM will install configuration into /etc/ansible/ansible.cfg automatically.
Update Ansible (master/development branch)
Just do a git fetch if ansible is installed via GitHub checkout, then checkout -b the latest branch
cd ~/DevOps/ansible/ansible && git fetch

# list all remote branches
$ git branch -a
  devel
* release1.4.5
  remotes/origin/HEAD -> origin/devel
  remotes/origin/devel
  remotes/origin/release-0.6
  remotes/origin/release-0.7
  remotes/origin/release-0.8
  remotes/origin/release0.9
  remotes/origin/release1.0
  remotes/origin/release1.1
  remotes/origin/release1.2
  remotes/origin/release1.2.1
  remotes/origin/release1.2.2
  remotes/origin/release1.2.3
  remotes/origin/release1.3.0
  remotes/origin/release1.3.1
  remotes/origin/release1.3.2
  remotes/origin/release1.3.3
  remotes/origin/release1.3.4
  remotes/origin/release1.4.0
  remotes/origin/release1.4.1
  remotes/origin/release1.4.2
  remotes/origin/release1.4.3
  remotes/origin/release1.4.4
  remotes/origin/release1.4.5


# use latest development branch
git checkout -b devel
# same as git checkout -b devel origin/devel